Thursday, December 31, 2009

SU! MINI OCCASIONS BLOG TOUR - BOLO (be on the lookout!!!)

SA OCCASSIONS MINI BLOG TOUR

Woohoooo, it's almost here! Mark your calendars for Friday, January 1st when another fun blog tour will be presented by Stampin' Addicts! The tour opens at noon and will run through Sunday, January 3rd. 23 SA forum members are participating and each will showcase a different item from Stampin' Up's brand new 2010 Mini Occasions catalog - giving you some wonderfully creative previews of the new products available for order on January 5th. Your copy of the new mini catalog should be arriving in your mailbox soon!

Dedicated to all things Stampin’ Up, Stampin’ Addicts offers SU-oriented galleries, challenges and special events. Membership is free of charge, and is open to Stampin’ Up fans everywhere. Give it a look, it's a great place to hang out!!!


Saturday, November 14, 2009

Forgotten Stash

I was working on reorganizing the closet in my stampin' quarters yesterday and came across a package of cork trivets I had purchased several months ago.  I'm sure you understand ... one of those things I saw that I thought "hey, I bet I can do something wonderful with that!", and it magically jumped into my shopping cart.  Once home, it was put into the closet where it was quickly buried forgotten (I prefer to believe it was hiding from me).  With the holidays quickly approaching I thought I would finally take some time to play and see what I could come up with ...  

CORK MESSAGE CENTER - CLOSE UP

... a nifty message center!  On the left side is a dry erase marker board for those quick little notes I'm always needing to jot down, the right side is a mini calendar and bulletin board.  Lucky me, I just happened to have some push pins that color coordinated with the Stampin' Up! Cottage Wall designer series paper.  I cut the prongs off of a jumbo white grommet, attached it to some ribbon and used it as a hanger.  Below is a picture of it hanging proudly on display!

CORK MESSAGE CENTER


Recipe

Stamps: Flower Fancy, Grateful Greetings
Paper: Whisper White, Old Olive, Cottage Wall dsp
Ink: Old Olive, Orchid Opulence, Rich Razzleberry
Accessories: Old Olive 1 1/4" striped ribbon, Rich Razzleberry polka dot ribbon, jumbo grommet, corner rounder punch, sticky tape


Sunday, November 1, 2009

Slump-buster

Need a card and have no idea where to start?  In one of those creative slumps?  Take a peek in your Stampin' Up! Idea Book and Catalog, it's a wealth of wonderful inspiration at your fingertips!

On this card I used a layout from page 27 in the IBC, chose some of my fun new holiday toys to play with.  Do you see the tiny bit of shimmer on the Santa and reindeer image (ok, so you have to really squint to see it - the photo doesn't do it justice) ... just ink up your stamp with classic ink, then use a dauber and lightly dab with the new shimmer paint - I used Champagne Mist.  It really gives the card a sparkly glow!  The smaller snowflake (Merry Details sizzlet) was cut from Night of Navy cardstock, then sponged with more shimmer paint ... oh how I love this stuff!  If you're wondering, the background is just wadded up wax paper, which I smooshed in the ink pad and "stamped" it randomly in Brocade Blue and Night of Navy (saran wrap works well too).  I really like the results of this technique.

Shimmering Snowflake 
Card Recipe:
Stamps: 
Wandering Words
Paper:  Brocade Blue, Night Of Navy, Real Red
Ink:  Brocade Blue, Night of Navy, Champagne Mist Shimmer Paint
Accessories:  Jumbo Snowflake Punch, Merry Details Sizzlit, Big Shot, Polka Dot Ribbon, brad, dimensional, sponge dauber, Scallop Edge punch


Thursday, October 29, 2009

Finding Inspiration

I saw an ad in a magazine last month, I loved the way they had patterned papers scattered for display.  This idea has been rolling around in my head ever since and I was wondering if I could actually bring it to life.  Stampin' Up! has so many cute designer papers, all of which I thought would be perfect for this project!  Using a full 12" length strip of dsp allowed me to complete two cards.

I do have to thank a wonderfully kind and talented friend (thanks Susan!!!) for teaching me how to make the beautiful butterflies ... and if you are reading, you're right ... I WAS making those antennae much harder than they were!

Nouveau Chic Sampler 1

Nouveau Chic Sampler 2
Card Recipe:
Stamps:
Great Friend, Wings of Friendship
Paper: Sage Shadow, Basic Gray, Apricot Appeal, Nouveau Chic DSP
Ink: Sage Shadow, Basic Gray, Apricot Appeal
Accessories: Big Shot, Matchbox die, Beautiful Butterflies die, brads, hemp twine, dimensionals, sponge


Monday, October 26, 2009

Paper Scraps

I hate throwing away all those little scraps of paper I seem to create and it doesn't take long for my desk to become somewhat buried.  This weekend I decided to finally put them to good use!

What more perfect way to use them up than to make some birthday cards using Stampin' Up's new Sweet Centers stamp set.  These cards were my first attempt at this 3-D balloon ... it was a bit of trial and error to achieve the dimension I wanted.
 
Sweet Centers Birthday Balloon

Card Recipe: 
Stamps:  Sweet Centers, A Little Birthday Cheer
Paper:  Ruby Red Textured, Certainly Celery, Crushed Curry, Whisper White, Happy B-Day SS
Ink:  Brocade Blue
Accessories:  Rhinestone brad, scallop circle punch, marker, dimensional


I was much happier with how this second card turned out.  Using four scallop circle punches instead of the three that were used on the first card seemed to make a huge difference.  I also popped the rhinestone gem out of the brad and glued it on the banner.

Sweet Centers Birthday Balloon II

Card Recipe:
Stamps:
Sweet Centers, A Little Birthday Cheer
Paper: Pretty In Pink, Whisper White, Certainly Celery, Happy B-day SS, Tea Party DSP
Ink: Almost Amethyst
Accessories: Rhinestone brad, marker, scallop circle punch, ticket corner punch, Tombow Multi Purpose adhesive, dimensionals


Friday, October 16, 2009

I Love a Clean Desk!

I am all caught up, have spent this entire week finishing up several projects that have been patiently awaiting my return.  I can't tell you how good I felt finishing those items AND finding my stampin' desktop clutter free once again.  As my children used to tell me many years ago ... "this is the bestest day ever"!

My now clean creative corner kept calling my name, finally luring me back into it's web ... to make yet another mess (just a slight mess this time).  I have always loved the look of those "pleated flowers" I have seen others make but honestly was quite intimidated to give it a try myself.  Thanks to a dear friend who incorporated this idea into a class project (which was one of those many things I needed to finish up!), I discovered how very simple these were and decided to try my hand at making one for a card. 

HAPPY HALLOWEENI started with the pleated flower, felt that the size and shape warranted a 5" square card for a change of pace.  It is matted with the exclusive Stampin' Up! Bigz Clear Scallop Square Die.  See that purple scalloped mat in the back???  That is made using 4 cuts from the same die, overlapping and adhering to make a wonderful mat for the original die cut.  I love it when an idea in my head works out the way I envisioned it! 

Card Recipe:
Stamps
From the Crypt
Ink:  Versarmark
Paper:  Basic Black, Pumpkin Pie, Cast-A-Spell designer series paper
Accessories:  black embossing powder, mini glue dots, pop-up glue dots, Bigz Clear Scallop Square die, circle punch


Saturday, October 3, 2009

It's Party Time ... MDS Style!

My Digital Studio Blog Party

It's finally time to celebrate the official rollout of Stampin' Up!'s My Digital Studio software.  Some of us from Stampin' Addicts have come together to throw a blog party to show you some samples of what we have been having fun with the past few weeks.  This blog party is a little different in that it will be active for the entire month of October ... you don't have to rush through all the blogs in one weekend ... please come back and revisit as often as you would like!  There is a button in my sidebar on the left side of the page that will take you to my announcement post where you will find a list of all the party participants.  Without further ado, I'd like to show you what I've been up to, and maybe, just maybe, spark your interest in the MDS program a bit more.

For my first project I decided to make a birthday card using a photo my daughter had taken.  Long story short ... my grandson is the ultimate Star Wars nut - when we were in Las Vegas a year ago my daughter saw someone dressed up as a Storm Trooper and was kindly allowed to take a photo to take home to her fav nephew.  I have always wanted to make him a Star Wars birthday card, but alas, Stampin' UP! has no Star Wars stamps.  What a breeze this was to make with MDS - took all of about 15 minutes. 

I love the ability to create oval crops of your photos and mat them perfectly!  I then located a star stamp in the software, resized to fit my needs and scattered a few in each corner - again, matting perfectly with a click of a button and adding drop shadows for depth.  Then I chose a black brad, copy and pasted to add one to the center of each star.  Gray grosgrain ribbon is in this program ... woohoo, perfect!!!  Did you notice that little staple I added to connect the ribbon pieces?  Yup, in the program also! 

MDS STORM TROOPER  HYBRID STORM TROOPER

The first photo is straight from the MDS program, which you could then have printed through their professional service if you would like.  The second photo is a "Hybrid" card I made using the same project.  I just printed it out, cut and matted onto red cardstock - added brads to all those tiny stars and added a piece of hodgepodge hardware and red brads around the sentiment.  How cool is that!!!

I am super excited about my next project, and LOVE how this turned out.  I started out playing with the software to make some "designer" cardstock of my own.  I used a script background paper in MDS, then added the damask stamp from Friends 24-7; copy and pasted, lined it all up and printed on whisper white cardstock.  Then I decided it MUST be double sided so back to work I went, this time using a soft flower background - then "stamping" a torn edges floral border on the edges and in the middle.  I turned the whisper white cardstock over and printed this design out.  So what do you think so far???

MDS DESIGNER CARDSTOCK
Stay with me ... the next part is what I think is the really cool part!  I took this card stock and cut out two envelopes using the Sizzix Bigz Scalloped Envelope die.  Used the remaining pieces of scrap designer paper to form the bottoms and sides to appear more "tailored".  Added a felt flower, large brown button from the Button Latte collection and a snip of celery ribbon to the front ... jumbo eyelets to the sides and Old Olive grosgrain ribbon to form the handle for this cute little purse box!   Do you see the double sided paper in action and are you loving it so far?  There's still more!

SCALLOP ENVELOPE PURSE BOX
Can you see those cute little note cards peeking out of the box?  Those are 3x3 cards (they fit perfectly!!!) which were once again designed entirely with My Digital Studio to create custom designer cardstock, then printed out on whisper white cardstock.  I cut the paper into 3x6 pieces, to form the three gift cards.  All I added was a photo corner punch using leftover scraps from the original box cardstock, a felt flower and a brad.  I think these would make a really special gift!

DESIGNER 3x3 CARDS

I hope you have enjoyed my creations as much as I enjoyed designing and sharing them with you. 

Remember, this is an ongoing party and all links will remain active until November 1st.  Take your time, visit these Stampin' Addicts blogs often for more ideas on using MDS to its fullest! 

DMDezigns/Dawnmarie: My Digital Studio - The Birdseye Overview
HowManyCats?!/Comeka: Digitize Your Sketch Library with MDS
Yapha: Turning Templates into Treasures
Willysgirl/Sarah: MDS Xmas and Extras
Hollylogic/Holly: MDS as a Design Tool (or How Not to Slice Up All Your Brushed Gold)
Lyssa: Playing with Stamps You Don't Own
Lilysinkpad/Sara: Simply Scrappin' Kits Go Digi
JulieA/Julie: Wanna Little Music with Your Slideshow?
lovetostampandscrap/Cheryl: Creating a Calendar to Beat All Calendars
Melina Stamps!/Melina: Man-Scrapping with MDS
BroncoMom/Joyce: Build Your Own DSP
Britiney: Clever Album Covers - A Piece of (Cup)Cake
S1itcher46/Kim: Hybridizing and Cataloging Collections
Kelli: Side-by-Side Test: Is it Actual or Is It MDS?
Scrapbookmama/Ellie: Keeping the Spotlight on Your (Adorable!) Subjects


Thursday, October 1, 2009

You're Invited ... to a My Digital Studio blog party!

Stampin' Addicts My Digital Studio Blog Party

We're trying something a little new and different for this upcoming event.  Starting at noon EST on Saturday, October 3, Stampin’ Addicts will be hosting a Blog Party that will be done carnival style.  I will be posting links to ALL of the party participants creations in this post.  Each blog will also have a sidebar button that will link you to the entry with the master list of blogs, which should make it easy for you to find your way back.  All links will remain in place and active until November 1st, so you can visit and revisit at your leisure! 

This party will be showcasing many fun, exciting and different ideas on how to use the My Digital Studio software.  Don't think just digital scrapbooking ... this software is so much more, limited only to the extent of your imagination!  We all have had so much fun getting ready for this event and can't wait to show you how incredible My Digital Studio really is.

This is the party you won't want to miss (no special attire is necessary!!!).  Be sure to join us this weekend as we celebrate the launch of Stampin’ Up!’s My Digital Studio!

Here's a list of all the blogs participating in this party.  Enjoy!

1. DMDezigns/Dawnmarie: My Digital Studio - The Birdseye Overview
2. HowManyCats?!/Comeka: Digitize Your Sketch Library with MDS
3. Yapha: Turning Templates into Treasures
4. Willysgirl/Sarah: MDS Xmas and Extras
5. Hollylogic/Holly: MDS as a Design Tool (or How Not to Slice Up All Your Brushed Gold)
6. Lyssa: Playing with Stamps You Don't Own
7. Lilysinkpad/Sara: Simply Scrappin' Kits Go Digi
8. JulieA/Julie: Wanna Little Music with Your Slideshow?
9. lovetostampandscrap/Cheryl: Creating a Calendar to Beat All Calendars
10. Melina Stamps!/Melina: Man-Scrapping with MDS
11. BroncoMom/Joyce: Build Your Own DSP
12. Britiney: Clever Album Covers - A Piece of (Cup)Cake
13. S1itcher46/Kim: Hybridizing and Cataloging Collections
14. Kelli: Side-by-Side Test: Is it Actual or Is It MDS?
15. Scrapbookmama/Ellie: Keeping the Spotlight on Your (Adorable!) Subjects


Monday, September 28, 2009

I'm Back ... and playing with my MDS software!

Due to a serious creativity slump, my tiny little blog has been feeling very neglected.  I'm sure there aren't many people who check my blog on a regular basis anyway, but I still hate posting just anything - it has to be perfect ... at least in my goofy mind!  So today I finally took some time to create something I felt was actually "blog-worthy". 

I saw a card similar to this in one of the many craft magazines I read, loved the concept and layout and thought it would be fun to see if I could CASE it using SU's new My Digital Studio software.  I'm amazed at how quick and easy projects are to complete, as well as the ability to perfect them without all that paper waste and frustration I put myself through.  I think I have fallen completely in love with this program (surprise, surprise)!!!   

MDS Holiday WishesCard Recipe (all items from the MDS software):
Stamps: 
Cheep Talk, Season of Cheer
Colors:  Real Red, Old Olive, Very Vanilla, Basic Black

Paper:  Real Red, Very Vanilla, Christmas Jingle
Punches:  Modern Label Punch 
Embellishments:  Christmas Jingle Borders, Christmas Jingle Elements, straight stitching, buttons, brads


Sunday, September 6, 2009

Think Fast! Think Easy!

As promised, I've finally found some time to post more details on the Autumn Meadows card set I created for the Stampin' Addicts recent blog tour.  Admittedly, thinking fast is NOT something I am proficient at ... but it is something I'm working on.  I've found (for me anyway) that using SU's designer papers is a great way to make quick, easy and great looking cards. 

On this card I colored the Dyed Organza Ribbonacorns in with blender pens and covered with crystal effects.  I love this organza ribbon, so easy to die to match your project and always looks so elegant!
Card Recipe
Stamps:  Grateful Greetings, Autumn Splendor
Ink:  Chocolate Chip, Really Rust, Taken With Teal 
Paper:  Autumn Meadows DSP, Really Rust
Accessories:  Organza ribbon, tag corner punch, crystal effects, dimensionals

             * * * * * * * * * * * * * * * * * * * * * * * * * * * * * * * * * *

I was having a hard time deciding what I wanted to do with the random leaf print in the series, which had a lot of white space - decided to use it on the inside of the card with just the border peeking out the bottom.  PERFECT!
 CLOSED OPEN
Card Recipe
Stamps: 
Grateful Greetings
Ink:  Chocolate Chip
Paper:  Autumn Meadows DSP, Really Rust
Accessories:  5/8" grosgrain ribbon, scallop border punch

             * * * * * * * * * * * * * * * * * * * * * * * * * * * * * * * * * *

The large bold prints work very well as the main Bold Leavesfocal point of a card, then simplify with plain coordinating colors and a single stamped image/sentiment.  This card really didn't need any embellishments, sometimes less really IS more.

Card Recipe
Stamps: 
Wandering Words
Ink:  Chocolate Chip
Paper:  Autumn Meadows DSP, Taken With Teal, Really Rust, Chocolate Chip
Accessories:  Scallop Border punch


             * * * * * * * * * * * * * * * * * * * * * * * * * * * * * * * * * *

I know my tastes are different from others, but this has become my favorite card of the bunch ... again, quick and easy!  I cut 4 rectangles of the same size in two different patterns, then just layered them onto a card base alternating the patterns.  Topped with a single stamped image, a sentiment, piece of ribbon and a brad.  I twisted the ribbon before affixing the brad, going for a "different" look.

LAYERED TILES

Card Recipe
Stamps: 
Autumn Splendor, Grateful Greetings
Ink: 
Old Olive, Chocolate Chip
Paper:  Autumn Meadows DSP, Very Vanilla, Chocolate Chip
Accessories:  brad, ribbon, ticket corner punch, dimensionals

             * * * * * * * * * * * * * * * * * * * * * * * * * * * * * * * * * *

Last but not least is the cute little purse box that all these cards get put into if needing something for a gift-giving occasion.  The leaf was stamped with shimmer paint, GIFT BOX PURSEembossed with clear EP and cut out - then sponged with various colors to give it some depth.  It doesn't show in the photo well, but leaves are randomly stamped in Taken With Teal ink on the bottom section of the box.   
Recipe:
Stamps:
  Autumn Splendor
Ink:  Really Rust, Chocolate Chip, Taken With Teal 
Paper:  Autumn Meadows DSP, Taken With Teal, More Mustard
Accessories:  Champagne Mist shimmer paint, grosgrain ribbon, large eyelets, scallop border punch, dimensionals, sponge, thin magnet or velcro for closure


Saturday, August 29, 2009

Stampin’ Addicts Happy Holidays Tour – Autumn Meadows DSP

Stampin' Addicts Holiday Mini Catalog Tour

Welcome to the Stampin’ Addicts Happy Holidays Blog Tour! This tour will take you through 20+ blogs, each showcasing different items debuting in the new Stampin’ Up! Holiday Mini Catalog … available for purchase beginning September 1st.

I’m stop #8 along your journey. If you’ve been following the tour in order didn’t you just LOVE Holly’s gorgeous creations at Ink Paper Stamps! If you’re beginning the tour with me, don’t fret – the tour is a continuous circle so you can see all the wonderful and inspiring projects. Just follow the arrows at the bottom of my post. Without further ado here are the fun projects I’ve created featuring the new "to die for" Autumn Meadows DSP!

layered leaves

This paper SCREAMS fall to me, so my first project of course had to be Autumn themed with lots of leaves. I stamped the leaves with Champagne Mist Shimmer Paint then embossed with clear powder – sponged leaves with Really Rust and Chocolate Chip inks and cut them out. Each leaf is stacked and mounted with dimensionals to achieve the layered look I was hoping for. I love how they sparkle!

Card Recipe:
Stamps: Autumn Splendor, Grateful Greetings

Paper: Really Rust, Taken With Teal, More Mustard, Autumn Meadows DSP
Ink: Chocolate Chip, Really Rust, More Mustard
Accessories: Champagne Mist shimmer paint, ribbon, large grommet, clear EP, sponges, dimensionals

In my next project I tried very hard to think "outside of the box" (ok, so it was a very small box) ... a Christmas card using fall themed paper! I started with a piece of the blue chevron patterned paper (I think that's what the little wavy lines are called),Christmas Suspension stamped random flakes using the Serene Snowflakes set with white craft ink. Back to the new shimmer paints (don't ya just luv 'em!), stamped a design from the Delightful Decorations set using Platinum shimmer paint, punched it out with the new Ornament Punch - then layered it using the Holiday Windows Movers & Shapers. I did this twice (so it looks the same when you open the card) and sandwiched silver elastic cord between the layers. The inside of the card is another patterned piece from the Autumn Meadows DSP, felt it was perfect peeking through the window. This was my very first attempt at a suspension card, hope you are as happy with it as I am!

Card Recipe:
Stamps:
Serene Snowflakes, Delightful Decorations, Four The Holidays
Paper: Very Vanilla, Taken With Teal, Chocolate Chip, Autumn Meadows DSP
Ink: Chocolate Chip, White craft
Accessories: Platinum Shimmer paint, Ornament Punch, Holiday Windows Movers & Shapers, Circle Scissors, silver elastic cord

For my final project I incorporated the remaining papers and made a set of cards with a cute little purse box to tuck them into. I came across this box template long ago (so long ago that I have no clue as to who/where) and altered the size to fit just a few cards. The main box is stamped with the Autumn Splendor set using Taken With Teal ink, covered the lid with a piece of Chocolate Chip large leaf patterned paper. Cute, cute, cute! I will post more details on this project later in the week.
Autumn Meadows DSP card bundle Autumn Meadows DSP card box

I hope you enjoyed my projects with the new Autumn Meadows DSP, as much as I did creating them. Use the arrows below to continue on the tour and see what Lyssa has in store for you at Song of My Heart Stampers!

Links to all blog tour participants:

1. Tracy: Sweet Centers (Tracy’s Stamp Therapy)
2. Michelle: Gr
ateful Greetings (Come Stamp with Me)
3. Sarah:
Pumpkin Patch (Sarah’s Ink Spot)
4. Twila:
Twick or Tweet (Stamp a Little Longer)
5. Sara:
Haunting Hill & DSP (Lily’s Ink Pad)
6. Marie:
Night & Day DSP (From Combat Boots…)
7. Holly:
Autumn Splendor & Tablesetting Die (InkPaperStamps)
8. Joyce:
Autumn Meadows DSP (Stampin’ Central)
9. Lyssa:
Calendar Kit with Magnetic Box (Song of My Heart Stampers)
10. Trina:
Gifts of the Earth (Stamps and Whiskers)
11. Kim:
Wandering Words (Stitchin’ N Stampin’ on Paper)
12. Carmen:
Cold & Cuddly (Stamping Addiction)
13. Ashley:
Just Beclause & Christmas Cocoa DSP (Stamp with Ashley)
14. Dawnmarie:
Berry Christmas (DM Dezigns)
15. Rhonda:
Holy Family (The Stampin’ Bunny)
16. Kat:
Delightful Decorations and Punch (Kat’s Kards)
17. Cheryl:
Icicle and Merry & Bright Rub-Ons (Love to Stamp and Scrap)
18. Holly:
Serene Snowflakes (Holly’s Stampin’ Mania)
19. Paula:
Décor Elements & wood blocks (Stamping with Paula)
20. Linda:
Charming (Olive Stamps)
21. Barbara:
Simply Adorned (Creative Stampin’ Spot)
22. Yapha:
Bear Bigz Die and clothes (Yapha Stamps)


Thursday, August 27, 2009

It's Almost Tour Time!

I haven't posted to my blog for quite some time, wanted to send a quick reminder that the Stampin' Addicts Happy Holidays Tour will be starting on Saturday!  All blogs will be ready to go at noon and run through Monday August 31.  Come back here to jump on the tour and see lots of wonderful creations!

In the meantime, I thought I'd post this cute little teabag container I made a few weeks ago.  This is another idea I found when hopping around the internet, and of course once again I forgot where I found it (if it's yours please give me a shout and I'll be thrilled to give credit and link back!).  I altered the size to contain 3 teabags and changed the lid up a bit.  Doesn't the frayed ribbon look just like one of those oriental fans (use your imagination!)?  I used tiny thin magnets for the lid closure, but velcro would work just as well.  This is such a great idea if you are looking for a small and quick gift!

 teabag1jaw teabag2jaw
Project Recipe:
Stamps:  Dream Gardens
Paper:  Always Artichoke, Whisper White
Ink:  Always Artichoke
Accessories:  color spritzer tool, scallop border punch, tag punch, large tag punch, magnets, sticky tape, dimensionals, eyelet, 1/4" grosgrain ribbon


Monday, August 3, 2009

Quilted Calmness

After the craziness of last week, I've been looking forward to today ... quiet, calm, no plans other than time in my stampin' quarters. Well there were a few interuptions, but ya know I had to take a break to play with that cutie little baby next door ... and to visit with my favorite daughter-in-law for a bit. THOSE are the kind of interuptions I appreciate and welcome!!!

After looking at the SSC110 sketch challenge at Stamping 411, I was excited to participate once again. I decided on making the circle portion of the layout into a "quilt" using the Cottage Wall designer series paper, cut it out with the clear circle Bigz die and layered it with the scallop circle Bigz die. I love it when I have a picture in my head and it actually turns out even better than I imagined!


Card Recipe:

Stamps:
Flower Fancy, Heard From the Heart
Ink: Rich Razzleberry, Old Olive, Orchid Opulence, Certainly Celery
Paper: Old Olive, Orchid Opulence, Rich Razzleberry, Cottage Wall DSP
Accessories: 1 3/8" square punch, 1/2" circle punch, Big Shot, Scallop Circle Bigz die, Clear Circle Bigz die, Build-a-Brad, brads, ribbon, dimensionals


Sunday, August 2, 2009

Arrrrrrrr - Beware!

Today we were celebrating my little pirate's birthday ... ok, so 25 years old and 6' 3" really isn't little, but all of you with children know they will forever be little in your mind. Anyway, once again my stampers block coupled with one heck of a week left me running way behind. I MUST have a card for my baby and it MUST be handmade!

The pirate thing seems to be a running joke among my kids (ie: where do pirates eat? .... ARRRRRRbys) so I thought it fitting to use my new "Beware Pirates" set. The red bandana is from the "Pirate Time" set, was a tad too small for the skull so I trimmed the skull to fit. I embossed the ship, sponged and distressed the layers; stamped the skulls, sponged, distressed, etc. then felt they really needed to be matted on "something" - but nothing looked right to me. I grabbed those wonderful new wood sheets from SU and cut a rectangle, sponged the edges, mounted with antique brass brads and loved the end result. I topped the card off with the ARRRRRR stamped on another piece of the wood sheeting and punched with the wide oval punch (super easy!!!), gave it a tad more sponging then tied a piece of the retired SU rope on top and frayed the edges. DONE, just in the nick of time. Baby boy loved his original card ... of course I told him he had to cherish it forever and ever.


Card Recipe:

Stamps: Beware Pirates, Pirate Time, Texture Wheel

Ink: Close to Cocoa, Chocolate Chip, Real Red, Chocolate Chip craft

Paper: Very Vanilla, Close to Cocoa, Chocolate Chip

Accessories: Wood Sheets, brads, clear embossing powder, distressing tool, wide oval punch, sponges, dimensionals, rope (retired)


Sunday, July 26, 2009

Dream, Dream, Dream

I fell in love with this stamp set the moment I saw it in the new catalog, but since it's arrival in my hot little hands I've drawn a complete blank.

The house was quiet yesterday so I took advantage and sat down to play ... decided to take a look at the Saturday Sketch Challenge at Stamping 411 for some (hopefully) inspiration.

I composed this a bit backwards, thought the caramel floral ribbon from the Masterpiece ribbon originals would be perfect with this image. From there I chose coordinating colors, backgrounds, etc. The most difficult choice was those teeny tiny embellishments in the corner - Yikes, what to do??? I tried using Chocolate Chip craft ink on some eyelets - after 3 hours they are still not dry. That's ok, I discovered pearls from the Pretties kit finished this project off perfectly! What do you think?

Card Recipe:

Stamps: Dream Gardens, Woodgrain, Medallion
Ink: Creamy Caramel, Close to Cocoa, Chocolate Chip
Paper: Very Vanilla, Creamy Caramel, Chocolate Chip
Accessories: Circle Scissors, Masterpiece Ribbon Originals, Pretties pearls, dimensionals


Wednesday, July 15, 2009

New Toys In The House

I've seen some wonderful projects done using the new SU Decor Elements stencils, couldn't wait to order (and receive!) my very own ... which arrived on my doorstep yesterday afternoon. I found some time to play this morning, thought I would also make a submission for the Saturday Sketch Challenge SSC107 at Stamping 411.

I used sponges instead of a stencil brush, sponged the flower first on shimmery white cardstock (which doesn't show well in the photo) - then masked and sponged the ornament. For those that know me and are wondering ... yes I really DID cut out the entire scroll flower to use as a mask. I amaze myself sometimes (hehehe)!

Card Recipe:

Stamps: Teeny Tiny Wishes, Soft Holly wheel

Decor Elements: Vintage Ornaments #1 stencils

Paper: Shimmery White, Rose Red, Certainly Celery

Ink: Rose Red, Certainly Celery

Accessories: Gold eyelets, sponges, ribbon, Movers & Shapers Modern Label die, Modern Label punch, Word Window punch, black marker, dimensionals


Sunday, July 5, 2009

Razzle Dazzle Swap

Have you seen Stampin' Ups new catalog? Oh dear, I am in so much trouble - not sure that I can resist anything. I know I say it with every new release, but I swear this is the best one ever! In preparation for my delivery tomorrow (yeah, I'm bad and felt I HAD to pay for that expedited delivery) I decided to sift through my stacks of retired stamps and finally let go of some. I know I should have parted ways with many more, but it is so hard to see them go! If you're interested in some of the "oldies but goodies", check out the link to my sale list at the top of my blog (shameless plug!).

I can finally post this last card I made for a pre-order swap, now that all participants have received their sample. I was really on the fence about the new Razzle Dazzle set, but now that I've had a chance to play I'm glad I purchased it. It is so much fun, very whimsical and I see many future possibilities. Once again I used SU's new In Colors, along with a few other new toys that can be found in the latest catalog. Having the In Colors in marker form now opens up a whole world of opportunities!


Card Recipe:

Stamps: Razzle Dazzle

Ink (markers): Crushed Curry, Rich Razzleberry, Melon Mambo

Paper: Whisper White, Rich Razzleberry, Melon Mambo, Crushed Curry, Razzleberry Lemonade DSP

Accessories: Modern Label punch, Modern Label Movers & Shapers XL die, Word Window Punch, Eyelet Border punch, Rhinestone brad, markers, dimensionals


Wednesday, June 24, 2009

More Stampin' Fun, SSC104

Oh how I wish Baja Breeze wasn't retiring in a week, it looks so nice paired with the new Soft Suede. I'm also loving the new Modern Label punch, layers wonderfully with the word window punch! It's so much fun to find new uses for our old toys.
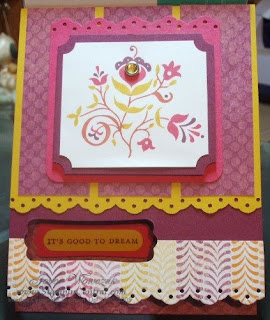
I took a little liberty with this weeks Saturday sketch challenge over at Stamping 411 and offset my main image just a bit. This is the very first time my Classic Sketches stamp set has seen ink, I'm sure it was feeling very neglected. This image just screams "distress me" so I sponged heavily. This is my end result:

Stamps: Classic Sketches, Teeny Tiny Wishes
Paper: Soft Suede, Baja Breeze, Whisper White, Parisian Breeze DSP
Ink: Soft Suede
Accessories: brads, word window punch, modern label punch, sponge, dimensionals


Tuesday, June 23, 2009

When I Can't Sleep ...

I play with my stampin' toys! I'm blaming these recent sleepless nights on the nasty midwest weather ... many heavy storms, followed by blazing heat and humidity. I suppose I can sleep through the heat, but the rain and lightning through my bedroom skylights make it dang near impossible. Anyway, I decided not to fight it last night and wandered into my stamping quarters and dug out these lovely window sheets to play with. Ok, I totally messed one up trying to figure out how to affix them without the adhesive showing - there has to be a clean and simple way to do this that my brain is refusing to process. Any suggestions???

I ended up using glue dots in the upper corners to stick the window sheet on - then covered them with a photo corner and pearls from the SU Pretties kit. I would have rather left the entire card blank, but those dang glue dots stick out like a sore thumb (as did everything else I tried)! The bottom I did use regular adhesive, just covered it with an eyelet punched piece of cardstock and ribbon. I fiddled with the ribbon a bit to have the polka dots only on the bow edges, decided I really like this new in color ribbon since it can be used plain or printed. While I'm not 100% sold on the card, I really do like how the bow turned out! hahahaha

Stamps: Hope Happens
Paper: Dusty Durango Textured, Crushed Curry, Razzleberry Lemonade DSP, printed window sheet
Ink: Soft Suede
Accessories: Soft Suede polka dot ribbon, photo corner punch, SU pretties kit/pearls, eyelet border punch


Saturday, June 20, 2009

Lots of Dots

Just messing around yesterday with my stamps, seems I've been procrastinating bigtime on starting my final swap project that is due next week (it has to be mailed on Monday!). A group I participate in had posted a color challenge for the week, thought I would try my hand at that first ... a lame attempt to get those creative juices flowing again. That's my excuse and I'm sticking with it!

This color challenge inspiration came from a blanket (I think), the print was so gorgeous - colors were Rose Red, Taken with Teal, Elegant Eggplant and Whisper White. I've never thought about putting these colors together, but I really like the end result. The background was made with the polka dot background stamp from Stampin' Up!, I hand colored all those little dots to mix up the colors. Unfortunately the teal stamped more like the color eggplant. Oh well ...

Stamps: Simple Friendship, Polka Dot background

Paper: Rose Red, Whisper White, Taken With Teal, Elegant Eggplant

Ink: Taken With Teal, Elegant Eggplant, Rose Red

Accessories: scallop border punch, markers, scallop circle punch, 1 1/2" circle punch, circle scissors, pennant Bigz XL die, little dots texturz plate


Monday, June 15, 2009

A Happy Sunday! SSC103

I can't believe it's Monday already, not sure exactly where I lost last week ... guess time really does fly when you're having fun! It also means it is once again time for the Saturday Sketch Challenge over at Stamping 411, I'm determined to get my entry submitted on time this week.

Yesterday it was bright and sunny, I felt a teeny bit guilty toying with the idea of staying inside to stamp. When hub decided to get caught up on the yard work, the decision was made. I really hated to give up that rare opportunity of uninterupted stampin' time. I know you know what I mean ... no telemarketing calls ... no silly favors being asked ... no crises to attend to ... just good old fashioned, all alone, quiet, ME time! I took full advantage of it (thoroughly enjoying every minute) and got quite a bit accomplished. I finished one swap that I am participating in, which is what I based this card from. I had a very difficult time finding something for those thin upper and side panels - everything I tried seemed to take away from the softness of the main image. I finally decided to dig through my designer paper stash (aka: hoard) ... WOOHOOOOO, I found some Old Olive Patterns DSP that I was happy with! So here's my creation:

I must have stamped 100 various color/image combos with the new SU hostess set Kind & Caring Thoughts, finally hit on something that I was thrilled with. I applied Crushed Curry ink to the entire image, then used those little finger sponge daubers to edge the flowers with Dusty Durango and the buds with Old Olive. I used a marker to color the stems in Old Olive. I love how those flower buds look kind of yellowish green, yet the stem is so much bolder ... and I thought the flowers were so bright and cheerful. Give this a try, you won't belive how easy it is!

Stamps: Kind & Caring Thoughts, Tres Chic (background), Itty Bitty Backgrounds
Paper: Whisper White, Old Olive, Dusty Durango, Crushed Curry, Old Olive Patterns DSP
Ink: Crushed Curry, Dusty Durango, Old Olive
Accessories: Dusty Durango polka dot ribbon, rhinestone brad, large oval punch, scallop oval punch, wide oval punch, corner rounder punch, sponge, sponge daubers, marker, dimensionals


Thursday, June 11, 2009

Stamping 411 Saturday Sketch; SSC102

It seems I've been having a bit of a creative slump lately, and I've really been wanting to play with all my new "toys" from the recent SU catalog preview. I thought maybe trying my hand at the Stamping 411 Saturday Sketch Challenge would be a great place to start ... instead of sitting at my desk staring aimlessly at piles of paper, ink and stamps.

I started by using versamark on this wonderful wildflower image from the Asian Artistry hostess set, colored over the versamark with the new In Color markers (are you as excited about them as I am???) then heat embossed with clear embossing powder.

I tore a strip of paper to mask the background for the main image and sponged in some color. The tag is also an image from the same set, heat embossed and colored with blender pens.

The card base is one of the new In Colors ... Soft Suede. I LOVE this color, such a great addition! Sponging around the base gave it just a bit of added depth and the softness I was hoping for.

Stamps: Asian Artistry, Teeny Tiny Wishes, Sanded (background), En Francais (background)
Paper: Very Vanilla, Soft Suede, Dusty Durango
Ink: Old Olive, Crushed Curry, Soft Suede, Dusty Durango
Accessories: Clear EP, markers, blender pen, circle punch, small and large tag punches, hemp twine, distressing tool, sponges


Saturday, June 6, 2009

One Color Challenge

I finally found some time to stamp yesterday, this is the end result for my monthly demo swap challenge ... which was to use ONLY one color. You are reading this correctly, ONE color -
that means cardstock, ink, accessories - everything!

I admit, I will always without fail cuss about the challenge before I can finally get down to business and actually create something. I decided the only way to add more color was to sponge ... and sponge ... and sponge. When I thought I had done enough sponging, I sponged some more. Seriously, after making a dozen of these cards I thought my arm was going to fall off!

Don't you love SU's new In Color Dusty Durango though? With all the sponging, this color looks so incredibly rich (to me anyway). And how do you like that creative photo corner I came up with? I'd love to hear your comments. Please be gentle, I'm new at this blogging world!

Stamps: Font of You, Sanded
Cardstock: Dusty Durango
Ink: Dusty Durango
Accessories: Clear EP, small oval punch, scalloped oval punch, scalloped square punch, 1"circle punch, sponge, dimensionals, Big Shot Ovals original dies (to mask flower pot)


Thursday, June 4, 2009

Fun, Fun, Fun

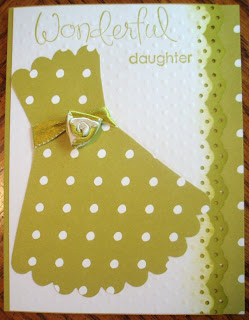
This card was so much fun to create! I've been wanting to make this darling little dress I saw on Patty Bennett's website, thought my daughters 22nd birthday was the perfect opportunity. I decided to make the belt with a ribbon rose, love, love, love the end result. The double sided satin ribbon really makes that rose POP. My daughter studied the card and declared that it looked like a replica of an old Homecoming dress she had. I took that as a wonderful compliment!


Stamps: Wonderful Favorites

Ink: Kiwi Kiss

Cardstock: Whisper White, Kiwi Kiss, Bella Rose DSP

Accessories: Kiwi Kiss satin ribbon, eyelet border punch, Bigz Scallop Die, Little Dots texturz plate


Related Posts Plugin for WordPress, Blogger...